Getting started with Auth0 in Exact Synergy Enterprise
Introduction
Note:
- This document is only relevant to the
controlled release participants.
- This is not available for Exact Cloud customers.
Auth0 is an authentication provider that is used by many
organizations to manage authentication between applications and different types
of user directories. For Exact Synergy Enterprise, Auth0 can be used to
integrate the organization’s identity providers and provide token-based
authentication for the users.
This document describes the overview of how to configure Auth0 in
Exact Synergy Enterprise. Topics such as Auth0 prerequisites, where to retrieve
the details from an Auth0 account, and how to use the details to configure
Auth0 in Exact Synergy Enterprise are also explained in this document.
To use the federated
identity provider, the account from the federated identity provider must be
acquired and configured for Exact Synergy Enterprise. For more information,
refer to the identity provider’s main web sites. Only one federated identity
provider can be used at a time in Exact Synergy Enterprise.
Prerequisites
The organization must have an active account with Auth0 before
Auth0 can be used in Exact Synergy Enterprise. The account must be configured
to have an Auth0 client that will be used for the Exact Synergy Enterprise web
application with the following settings:
- Client type is “Regular Web Application”.
- Token Endpoint Authentication Method is “None”.
- JsonWebToken Signature Algorithm (under the OAuth advanced
settings) is “RS256”.
- Grant types ”Refresh Token” and “Password” are enabled.
- WS-FED Addon is enabled and configured.
- The Auth0 connection is enabled for the client, and set as
“Default Directory” under the account’s API Authorization Settings.
Preparing and configuring the supported user database source
Each identity provider
may support different user database sources. For the usage of the federated
identity in Exact Synergy Enterprise, the user database source used must
support the email address as the default claim type. Furthermore, the email address
of the user should match the username (humres.usr_id column) of a person in
Exact Synergy Enterprise.
For Auth0, the
selected user database source must be configured for the client used for Exact
Synergy Enterprise, under Connections.
For more information, go to https://auth0.com/docs/clients/connections.
Signing up for Auth0
o sign up for Auth0, do the following:
- Go to
https://manage.auth0.com/login. The following page will be displayed:
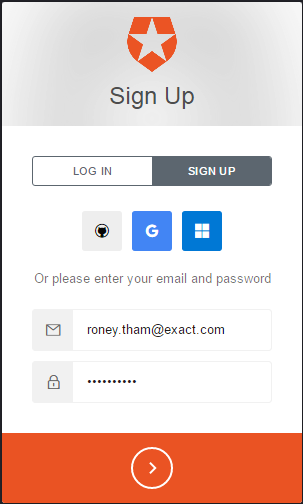
- Click SIGN UP.
- Type your email address and password.
- Click >. The following page will be displayed:

- Type your account name at Account Name.
- Select the region at Region.
- Select the agreement acceptance check box.
- Click CREATE ACCOUNT. The following page will be displayed:
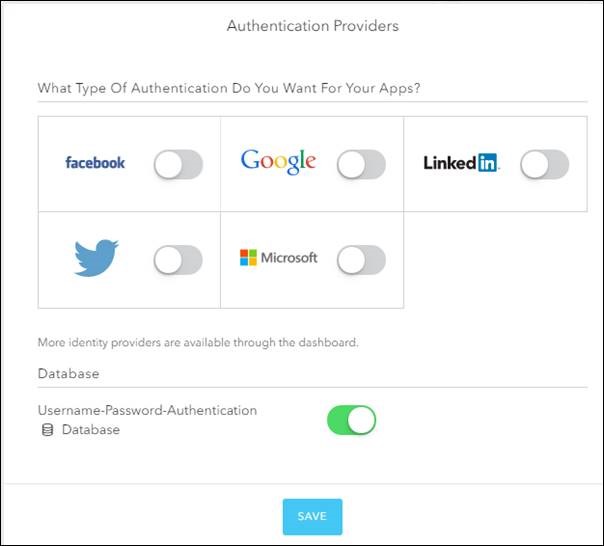
- Make sure the Database authentication provider is enabled.
- Click SAVE. You should now have an Auth0 account.
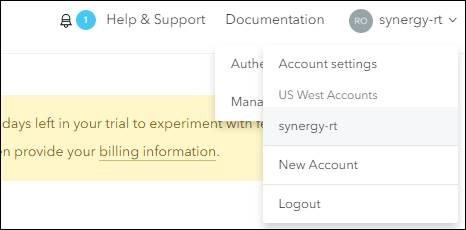
Your account name is always displayed on the top right of the page. When you
click on your account name, a drop-down menu will be displayed with the
Logout option.
To log in again, go to
http://manage.auth0.com/ and type your account details.
Setting up Auth0 database connection and users
The Auth0 users are
user accounts that can be used to log in to Exact Synergy Enterprise, Exact
Globe+, Exact Lightweight Integration Server (ELIS), and others if these
products have been configured to use the federated identity authentication
using Auth0.
Before you can use
these accounts, the following must be created:
- Auth0
database connection
- Users for
the Auth0 database connection
Creating the Auth0 database connection
- Log in to
your Auth0 account.
- On the left menu, select Connections,
and then select Database.
- On the database page, click CREATE
DB CONNECTION. The New Database
Connection page will be displayed.
- On the New Database
Connection page, type a name at Name.
- Click Create.
- Once the database is created, go to the Clients tab, and ensure your Auth0 database connection is set to
Default App.
- The Auth0
database is now created. The name of the database connection is your Auth0
connection value.
Creating users for the Auth0 database connection
- On the left menu, click Users.
- On the Users page,
click CREATE YOUR FIRST USER.
- On the Create user page,
define the following:
- Type an email address at Email.
- Type a password at Password.
- Type the same password again at Repeat Password.
- Select the database connection that you have created above at Connection.
- Click SAVE.
- Your user is now created.
Note:
- Auth0 will send a verification email to the user. If you want to
skip this step, click Actions > Edit Email. On the Edit E-mail page,
click Set email as verified.
- To create more users, repeat the steps above.
Verifying if the users can be used
- Go to Connections, and
then select Database.
- For the database connection that you have created, click Try
on the right of the database connection name.
- In the login screen, type the email address and password of the
user that you have created, and click >.
- If the user has been successfully created, the following page will
be displayed:
- These are the Auth0 users that you can use for your federated
identity authentication.
Configuring Auth0 application
Auth0 applications are configurations that represent, and are used
by Exact Synergy Enterprise, Exact Globe+, ELIS, and others for the federated identity authentication via
Auth0. Before you can set up Exact Synergy Enterprise, Exact Globe+, ELIS, or other applications, you have
to configure the Auth0 application first.
Note: This
document describes reusing the Default
App that has been previously created but you can also create another
application.
To configure the Auth0
application, do the following:
- Log in to
your Auth0 account.
- On the
left menu, select Clients.
- On the Clients page,
click the name or settings icon of the Default
App to view the details.
- On the Default App
page, click the Settings tab.
- The Domain is your Authority and part of your JWT
Issuer Name value. For more information, see
How-to:
Retrieving information for Windows Azure Active Directory and Auth0.
- The Client ID
is your Client ID value and Allowed Audience value. For more
information, see
How-to:
Retrieving information for Windows Azure Active Directory and Auth0.
- Type the
Exact Synergy Enterprise URL that you will configure for Auth0 at Allowed Callback URLs and
Allowed Logout URLs. Make sure the Exact Synergy Enterprise URL has a
trailing slash, and is in lower-case to avoid mismatch of values.
Note:
- For
Allowed Callback URLs:
Type
the Exact Synergy Enterprise URL as {Synergy URL}/docs/SysFederatedLogin.aspx
whereby {Synergy URL} is the Exact Synergy Enterprise URL starting with http or
https. Also, type the URL “https://{accountname}.auth0.com/mobile”
whereby {accountname} is the name of your account. The two URLs should be
separated by a comma.
- For
Allowed Logout URLs:
Type
the Exact Synergy Enterprise URL as {Synergy URL}/docs/SysFederatedLogin.aspx
whereby {Synergy URL} is the Exact Synergy Enterprise URL starting with http or
https.
- Ensure Use Auth0 instead of the ldP to do Single
Sign On is enabled.
- Click the Show Advanced
Settings hyperlink to view the Advanced
Settings section.
- Under the Advanced Settings section, click the OAuth tab.
- Select RS256 at JsonWebToken Signature Algorithm.
- Enable the
OIDC Conformant field.
- Click the Grant Types tab.
- Under
the Grants section, enable the Authorization code, Refresh Token, and Password grants.
- Click SAVE CHANGES.
- Click the Addons tab.
- Enable WS-FED.
- On the Addon: WS-Fed (WIF) Web App page, type
the realm value at Realm. This is
the App ID in URI format whereby this should be the same value as your callback
URL. This value is your App URI value. This value is case-sensitive; you should
use the exact value, including any symbols. You are advised to always use lowercase and a trailing slash to avoid a mismatch of the values.
- Click SAVE.
- Close the Addon: WS-Fed
(WIF) Web App page.
- Click the Connections
tab. Ensure the database connection that you have created is also enabled for
this Auth0 application.
Viewing Auth0 logs
The authentication activities from Auth0 can be viewed by clicking
Logs on the left menu.
Configuring Exact Synergy Enterprise
Overview of Exact Synergy Enterprise with Auth0 configuration
To use the Auth0 provider with Exact Synergy Enterprise, the
following configuration details from Auth0 must be made available in Exact
Synergy Enterprise:
- Authority
- Client ID
- Client Secret
- App ID
- Allowed Audience
- WS-Fed Metadata URL
- WS-Fed Issuer
- JWT Issuer
- SAML Issuer
- Thumbprint
- Auth0 Connection name
- Authorization Endpoint
- Token Endpoint
The configuration details stated must be entered in the Federated
Identity Configurator, to generate the federated identity configuration files
for Exact Synergy Enterprise.
Furthermore, you have to set the IIS server to use Anonymous
Authentication.
Retrieving Auth0 configuration details
To retrieve your Auth0 configuration details, log in to your Auth0
account and view the Auth0 application or client that you have configured for
Exact Synergy Enterprise.
For more information on how to retrieve these details, see How-to: Retrieving information for Windows
Azure Active Directory and Auth0.
Note: All
values are case-sensitive; you should use the exact value, including any
symbols. You are advised to always use lowercase and a trailing slash to avoid a mismatch of the values.
Configuring the Auth0 details into Exact Synergy Enterprise
To configure Exact Synergy Enterprise to use Auth0 as the
authentication provider, the web application must have the following files
configured for the token-based authentication:
- web.config
- system.identityModel.config
- system.identityModel.services.config
These files should be configured and generated by the Federated
Identity Configurator.
- Start the Federated Identity Configurator, by starting
FIDConfigurator.exe in the Cab folder of the Exact Synergy Enterprise
installation folder. The tool requires read and write access to the installed
folders of Exact software. Therefore, it is recommended the tool be used with
Administrator privileges.
- Select Exact Synergy
Enterprise from the Products menu on the left.
- Type or select the installation directory of Exact Synergy
Enterprise at Installation Folder. When a path is specified, the tool
will validate the path. If the path is validated successfully, the
configuration section and buttons will be enabled.
- Select Auth0 at the Identity Provider field.
- Define the following fields:
- SAML
Issuer Name
- Authority
- Auth0
connection
- JWT
Issuer Name
- Client
ID
- Client Secret
- Allowed
Audience (this field will automatically be filled, based on the value defined
at App URI ID)
- Realm
- Audience
URI - (this field will automatically be filled, based on the value defined
at Realm)
- Thumbprint
- Metadata
- WS
Fed Issuer
- Reply
- Authorization Endpoint
- Token Endpoint
- Click Validate. The
validation screen will be displayed.
- The values from the product screen will be checked for common
mistakes, such as formatting, typos, et cetera. The tool will warn you when a
value is suspected to be wrong so that you can verify and correct it if needed.
- Type a username and password (from your federated identity
account) to test if the configuration values are correct for authentication
use.
- Click Validate.
- If the validation is successful, click Generate. The federated identity configuration files will be
generated in the installation folder for the product. It will also be retained
for future product updates.
Note:
- Only after a successful validation, the configuration files can be
generated.
- All values are case-sensitive; you should use the exact value,
including any symbols. You are advised to always use lowercase and a trailing slash to avoid a mismatch of the values.
- For more information on how to retrieve these details, see
How-to: Retrieving information for
Windows Azure Active Directory and Auth0.
- The tool requires read and write access to the installed folders
of Exact software. Therefore, it is recommended the tool be used with
Administrator privileges.
- For more information about the Federated Identity Configurator,
see
Federated Identity Configurator.
Configuring ESE Web Application in Internet Information Services (IIS)
After configuring Exact Synergy Enterprise to work with the
token-based authentication, the Web Site Application in Internet Information
Services (IIS) must be properly configured.
- Open
the Internet Information Services (IIS) Manager.
- Go to
the Exact Synergy website in Internet Information Services (IIS)
Manager.
- Open Authentication.
- Make
sure Anonymous Authentication is enabled and Windows
Authentication is disabled.
- Restart
the IIS services, and you will be able to use Exact Synergy Enterprise with
token-based authentication through the Auth0 provider.
Additional information
Database Configuration File
When Exact Synergy Enterprise is used with the token-based
authentication, the database configuration file, db.config, will be in the root
folder of the Exact Synergy Enterprise installation. Therefore, Exact Synergy
Enterprise will require read or write access to this file.
Auth0 Profile
When using Exact Synergy Enterprise with Auth0, Exact Synergy
Enterprise will use the email address of the Auth0 user profile as the username.
Starting Exact Synergy
Enterprise
You should be able to
start Exact Synergy Enterprise in the browser where you will be asked to log in
via the federated identity provider’s login page. If this is not the first time
you are starting Exact Synergy Enterprise, the browser must run using the
built-in administrator account.
ExactWebGuest
ExactWebGuest is required for OAuth 2.0. The Exact
Synergy Enterprise database should have the public user for OAuth 2.0. If the
public user is not present, the public user must be created. ExactWebGuest is required
for the error logging related to the authentication. For example, error due to
misconfiguration. To create ExactWebGuest, see How-to: Setting up public website.
Related
documents
| Main Category: |
Attachments & notes |
Document Type: |
Online help main |
| Category: |
|
Security level: |
All - 0 |
| Sub category: |
|
Document ID: |
27.543.221 |
| Assortment: |
Exact Synergy Enterprise
|
Date: |
22-11-2022 |
| Release: |
|
Attachment: |
|
| Disclaimer |